Troubleshooting

Faced with the bug, unknown program behavior or any issues?
We will be glad to support and resolve the issue, but we need log files of the program:
C:\program files\rohos\ *.log

Error strings
What does an error mean?

“Your password can not be virified”

If you have a Microsoft account, with a PIN code, you can not use this pin code to configure the USB key. You need to use the password from the Microsoft account.

“USB Key was not configured for this computer, it will be ignored”
You may see it in the following cases:

  1. The USB key was not configured for this computer, i.e. it does not have a valid logon profile for this PC (no login profile with the local computer name or “”).
    Domain field in login profile should contain: computer name where you log in, (blank line) or \\ domain name- only if Rohos welcome screen gina.dll is used.
    To resolve this error:
    – Install USB Keys Management utility and set up profile accordingly
  2. This is a ‘stranger’ USB Key and it is ignored by Rohos logon because the computer owner already has configured its USB flash drive for this computer.
    By default, Rohos bounds up to the first configured USB Key. Even USB Keys that was configured with a USB Key Management utility will be ignored.
    The following registry value enables this security option:
    HKEY_LOCAL_MACHINE\SOFTWARE\Rohos – CheckUSBserial=1
    To resolve this error:
    – Clear the CheckUSBserial value or setup this USB flash drive on the local computer using Rohos Logon Key main window.
  3. USB Key was created by simple Rohos files copy operation into another USB flash drive.
    To resolve this error:
    – Set up USB Key over again

Demo Key. Key registration is required
It means that USB Key setup has been made using USB Key Management utility without license keys
To resolve this error:
– Add license keys to USB Key Management utility

Your Rohos license does not support this feature. Please upgrade your license.
Usually it means that the USB Key contains several login profiles and personal license is used.
To resolve this error:
– Purchase a PRO license or have only a single login profile on the USB Key (clear it and re-configure again).
The benefits of PRO license:

  • Use a single USB Key to log in into multiple computers/user accounts.
  • You can log in into Remote Desktop login by USB flash drive.
  • Support for Novel Client for Windows
  • Support for Windows Domain, Active Directory.

Examples and advices

In this section you will find out real deployment examples and advices.

Prolonging trial time up to 60 days.

We realize that testing time of the Rohos Logon Key software requires more that 15 days. Therefore 15-day testing time can be extended to 60-days. Make a request to get a prolongation Registration Key in order to thoroughly test Rohos Logon Key in your company.
Contact: info@rohos.com.

How to try Rohos Logon Key in the company?

Please read this chapter if you are going to use the solution in the company with more than 20 associates.
Rohos Logon Key offers such an innovation that affects Network Administration parts and company associates. Therefore we recommend trying it with the help of focus group:
Select a small department or group of computer users in the company where you can try Rohos password replacement solution with USB Keys;
You will need 10 USB flash drives for test.

Installation recommendations:

  • Do not disable login via manual password entry from the beginning of the test.

Divide your test into 2 stages:

  1. Test the general USB key login possibility within the focus group;
  2. Test all the USB Key login features during the actual rollout of the entire solution in the small department (room).

After that you can install Rohos on the rest of the network.

Example 1. Windows Active Directory based on the network. Local login.

Before you begin, read please our article about this task.

  1. First, install Rohos Management tools into your (Admin’s) workstation.
  2. Set up all USB Keys with all passwords fore each person, using USB Key Management utility;
  3. Install the application on the workstations using MSI package or simple application from our site;
  4. Hand out the USB Keys;
  5. Verify, if every user can login his account on every workstation with USB key.
  6. Launch Rohos Remote config application on administrator’s computer. Export the list of USB keys to each connected workstation.
  7. Using this application, configure all the workstations to check serial number of USB key.
  8. From now all the users can logon only with these USB keys.
  9. Now create a new usb key for any user but don’t export the information about it on other computers. It must be ignored by other workstations.
  10. Now the system is protected from home-made keys.
  11. Now is necessary to disallow the access without USB key. It is possible to realize in two ways:
    – for all the users, who you made a key for
    – only for several users, not matter, have you made the keys for them or not.

In first case, Using Rohos Remote config application, configure all the workstations to disallow login for listed users. Select a computer of the domain, and select for listed users from the list 2-factor authentication control type. Click Save settings.

In second case you need to create a new group with rohos name and add desired users there . Now, using Rohos Remote config application, configure all the workstations to disallow login for rohos user group. Select a computer of the domain, and select for rohos user group from the list 2-factor authentication control type. Click Save settings. Now these users can login only with USB key.

Note: this function will work only on workstations, where Rohos Logon Key application is installed. Simple export of configuration to the computer, where  Rohos Logon Key application is absent will not work.

Example 2. Protecting of the Terminal Server with Rohos Logon Key application.

  • Before you start to configure Rohos Logon Key for Remote desktop connection, visit please our article, regarding to this theme.
  • What application must we select to configure USB keys for remote connection to Terminal server? USB key manager or Rohos Logon Key? The answer is depending, what level of security do we need, and what type of USB key do we have.
  1. USB key manager supports the limited number of USB key types. You can see this list, if click Settings button on main window of this application.
  2. USB key manager application can not write a password in encrypted form on USB key. This is possible only with Rohos Logon Key application. By one hand it is an opportunity, because encrypted password is possible to use only on one computer – there, where this USB key has been prepared.  By other hand, the password in plain form is less secure, because everyone can see it, with using of USB key manager. (If he has got this key for a while)
So, If we use USB key manager, we can use only limited number of usb device types, and the password will be stored in plain form. But the speed of USB key preparing is rising significantly.
If we need the high level of security, or our key is not supported by USB key manager, We are forced to create all the keys in Rohos Logon key application on target computer. In our case – on terminal server via RDC connection. First we need to install Rohos Logon key application there and select the type of USB key.
For all the users the type of USB key must be the same. After the preparing of USB keys on target computer, in settings of Rohos Logon Key application automatically is installing the feature check serial number. So, a key will contain the password in encrypted form, and our system will be protected from home-made strange keys.
If we use USB key manager, the next step is – to export the list of USB keys to terminal server, to prevent the using of strange USB keys. Click on USB keys button on main window, in Users window click Export button. A .reg-file appears on your desktop. Move it to the server and import in Rohos Logon Key application, Users and keys window. For sure, you may just double click on it and the information about USB keys will be added to server registry. Open the settings of Rohos Logon Key application, More.. button, switch on the option check serial number.

Important: If you want to use USB Flash drive as a key for Remote connection, and check serial number option will be on, To prepare all USB keys use only USB key manager application. It is necessary, because real serial number of USB flash drive is not transmitted to server, during the preparing of the key in Rohos Logon Key application. We continue to work to add the possibility to store the encrypted password on USB key for this case.

Registry keys

Rohos Logon Key uses Windows registry to store all program options.

Please note that only MSI and RW Server version installation packages set restricted access rights to Rohos registry values, thus preventing users from modifying program settings using Windows registry editor or Rohos window. The full access is granted only to Administrators group and SYSTEM.

HKEY_LOCAL_MACHINE\SOFTWARE\Rohos

Key’s name

Description and Definition (DWORD or string)

CheckUSBserial

1- bound up the program to the last configured USB key. By default, 1 is after the first USB key was configured

DisableLog

1 – disables log files

0 – (by default) enables logging

DisableRohosShutdown

1 – disables Rohos shutdown dialog

0 – (by default) enables it

LockUSBKey

1 – disables USB login key for user

0 – (by default) enables

all – disables all connected USB flash drives.

LogonType

Do not modify. See Chapter 3.3 Logon model, MSI option Logon Type (see Chapter 4.8))

RohosPath

Actual path to the program. Do not modify

USB_Only_login

0- (by default) enables manual password entry

1 – disable login without USB key for all users. Allows logging in only by USB key.

2 – disable login without USB key for listed users. Other ones can log in without USB keys.

3 – disable login without USB key for rohos user group in active directory

4 – disable login without USB key for users came through RDC

5 – disable login without USB key for users came through RDC outside LAN

USB_Key_remove_behaviour

0 – (by default) no reaction.

1 – locks Windows desktop after USB Key withdrawal from USB port.

2 – log off after removing of USB key

3 – turn off the computer

4 – Hibernate computer

5 – activate screensaver

6 – switch user

>50 – means time interval in seconds during which user can work without USB Key (see keyless mode feature)

USBLoginPicture

The USB Key icon on the login desktop.

(by default) green USB device

Full Path to gif/jpg/bmp/png file. Max 150*150 pics.

DisableSafeMode

1 – disables the operation of the program in Safe Mode.

HeaderTextColor

(RGB) the color of the texts on the welcome screen.

NoTextLabels

Disables defined texts on the welcome screen (clock, date).

DisableUSBatRDP

1 – allows using the access to Remote Desktop typing in the password.  (even ifUSB_Only_login=1)

DisableTimeLimits

1 – Disables working time counter – to calculate the amount of time spent on the PC during a day/week, and to display it in the shutdown/logoff window

0 – (by default) enables.

USBKeyDllName Determines  the type of USB key:

nothing- USB Flash drive

rohos_btkey.dll – Bluetooth key,
rohos_mifare.dll – MiFare 1K RFID
rohos_ed-fs-2044.dll – RFID readers. Easyident/Addimat
rohos_cr10mw.dll – RFID CR10MW
rohos_vson.dll – PC Lock USB dongle
rohos_jcardv2.dll – JCard V2M
rohos_otp.dll – Google Authenticator
rohos_phone.dll – Mobile phone (Android/iOS)
rohos_swk.dll – Swekey
rohos_ybk.dll – YubiKey
rohos_pkcs.dll – USB key of the PKCS standard

USBKeyPkcs11 Determines  the type of PKCS key

etpkcs11.dll – Aladdin eToken PRO
aseCardCryptoCSP.dll – Athena USB Cryptocard,
HiCOSPKCS11.dll – Futako HiToken V22
rtpkcs11.dll – Activ ruToken
utpkcs11.dll – uaToken
k1pk112.dll – iKey 10xx
dkck232.dll – iKey 20xx
aetpkss1.dll – iKey 30xx
sadaptor.dll – Crypto Identity 5
ep1pk111.dll – ePass 1000
ep2pk11.dll – ePass 2000
ngp11v211.dll – ePass 2000 FT12
eps2003csp11.dll – ePass 2003
pkcs_marx.dll – CrypToken
senselock_token.dll – trueToken (Senselock)
ST2pkcs11v10 – Securetoken ST2
st3csp11.dll – Securetoken ST3

The following values are only used in Rohos welcome screen (gina.dll) (see Chapter 3.3) logon model:

LoginPicture

Background picture for login screen.

CtrlAltDel

What happens when the user presses CAD:

1 Opens typical WinNT style security dialog.

2 Locks workstation

0 (by default) opens Task Manager in Windows XP, or CAD dialog in Win2000

DisableAdminUnlock

1 – Disables Administrator to unlock user session.

0  (by default)

DisableTypicalLogin

1 – Disables typical login dialog, where username, password and domain can be entered.

0  (by default)

WelcomeScreenHelp

Help string that is displayed on right-bottom of the login screen.

 turns off this help.

HKEY_LOCAL_MACHINE\Software\Microsoft\Windows NT\CurrentVersion\Winlogon :

LegalNoticeCaption – Login screen caption with big font. (Welcome to Windows by default);

LegalNoticeText2  Login screen notice text with smaller font. (by default)

Rohos Logon Key Internals

  1. Rohos Logon Key components:
    • Welcome.exe – Rohos Center (Control Panel), install/uninstall routines, login screen component;
    • Rohos_ui.dll – GINA module that replaces or makes a proxy layer;
    • Rohos_obj.dll  – remote login component that integrates into Remote Desktop Application;
    • Rohos_cp.dll  – Rohos credential provider for Windows Vista.
    • Ntserv.exe – welcome-screen service (used in Windows XP\Vista welcome screen + Rohos authentication method, see Chapter 3.3)
    • cximagecrt.dll – image processing library.
  2. USB Key profiles Rohos Logon Key stores all passwords’ information in the \_rohos\roh.roh file.
    This file in encrypted with AES encryption algorithm with a default password or PIN code if it is used.

USB Key protection

  • USB Key cannot be duplicated. Rohos prevents Key duplicate. Key logon profile is bound up with a USB flash drive serial number.
  • USB Key originality can be protected by PIN that is used for encrypting profiles.
  • USB Key that was created by USB Manager Tool cannot be modified on home computer (for example, Logon profiles cannot be cleared or modified by user using Rohos Logon Key program)

Installing Rohos Logon Key, MSI command-line options

To install Rohos Logon Key on network workstations you can use MSI package, regular EXE setup package with command line support or Compact installation package (without Start Menu shortcuts and UI).
Please note, when Rohos is running in a Network mode (connected to Active Directory domain wide settings by LDAP database) then these settings maybe overwritten by the domain-wide settings.

Rohos Logon Key Setup command line options:

rohos_welcome.exe /VERYSILENT /usbkeyremoval=2 /regkey=XXXXXXXXXXXXX /usbdev=rohos_pkcs.dll /onlyusbkeylogin=3 /disableui=1 /NoTextLabels=10 /DisableCredUI=1

regkey – license key (default “”);
usbkeyremoval = 2 – (default 0) logoff after authentication key unplug;
usbdev – (default “”) the type of authentication key, see below the list of 2FA means;
onlyusbkeylogin =1 – (default 0) Choose a 2-factor authentication policy options (see USB_KEY_LOGIN_ONLY);
disableui=1 (default 0) disable access to Rohos main window and also doesnt creates start menu shortcuts to Rohos Logon Key application;
NoTextLabels=10 – (default 0) Hide Rohos icon from Windows logon screen;
DisableCredUI=1 – (default 0) Hide Rohos icon from UAC credentials prompt dialog box (RunAs Admin command);
ADmode=2 (default 0) prevent Rohos to verify\connect to AD LDAP.
ADAPSkipSetting = “USBKeyDllName” (default “”) prevent Rohos to sync some kind of option from domain-wide settings list. In this example Rohos will stop sync “USBKeyDllName” option (the kind of 2FA means) this will allow to use a custom 2FA method on selected set of workstations.

XXXXXXXXXXXXX – license key

Rohos Logon Key MSI:

  • It is specially designed, so you can set up program settings during installation. MSI package public options (see Chapter 4.9) can be changed using msiexec command line or MST file
  • It sets up restricted access rights to registry settings installed by Rohos Logon Key. This prevents users from change of program settings via Windows registry or Rohos Center.
  • It does not install program shortcuts into Start menu;

MSI package options

Options that can be changed via command line (in msiexec.exe):

  • LOGON_CAPTION=”Welcome to the company”
    (by default =”Welcome to windows”)
    Welcome screen caption text (big one)
  • LOGON_TEXT=” ”
    (by default =””)
    Welcome screen text notice (small text under the clock)
  • DISABLE_LOG=1
    (by default =0)
    Turns off all LOG files that can be produced by Rohos Logon Key program.
  • USB_KEY_LOGIN_ONLY=1
    (by default =0). Choose a 2-factor authentication policy options:
    1- Forces ALL users to log in with 2FA method  (use Emergengy login or SafeMode boot to login in case of 2FA method is not available)
    2- 2FA is enforced for a listed users. Usually this list created on a local PC when a 2FA is created on Rohos Logon Key locally;
    3- For ‘rohos’ user group in Active Directory
    4- For Remote Desktop login. Only remote desktop sessions will be subject to 2FA process;
    5- For Remote Desktop login with IP filter; Only remote desktop sessions outside LAN will be subject to 2FA process;
  • USB_REMOVAL=1
    (by default =0)
    1- Locks computer upon USB stick withdrawal.
    2- Log off session
    3 – Shutdown computer
    4 – Hibernate
    5 – Screensaver
    6 – Switch user
  • If this value is >50, it means keyless mode – time interval in seconds during which user can work without USB Key
    (see keyless mode feature)

(This option replaces the same settings from Rohos)

  • DISABLE_CENTER=1
    (by default =0)
    Disables to open Rohos main window. Note: Users cannot change program settings because program registry (HKLM\Software\Rohos) are intended for reading only for users.
  • REG_NUMBER=””
    (by default =0)
    Rohos Logon Key registration number (license)
  • USB_KEY_DLL=””

By default = USB flash drive.
Determines the type of 2FA method (authentication device or technology), used as an authentication key.

Possible values:

empty – USB Flash drive

rohos_mifare.dll – MiFare 1K RFID
rohos_ed-fs-2044.dll – RFID readers. Easyident/Addimat/pcProx/KCY
rohos_jcardv2.dll – JCard V2M
rohos_otp.dll – Google Authenticator or OTP tokens, YubiKey
rohos_phone.dll – Mobile phone (Android/iOs)
rohos_ybk.dll – Yubikey ID or OTP authentication
rohos_pkcs – any installed #PKCS11 compatible token.

Supported PKCS#11 tokens:

etpkcs11.dll – Alladdin eToken PRO
aseCardCryptoCSP.dll – Athena USB Cryptocard
HiCOSPKCS11.dll – FUTAKO HiToken v22
rtpkcs11.dll – Aktiv ruToken
utpkcs11.dll – uaToken
k1pk112.dll – iKey 20xx
aetpkss1.dll – iKey 30xx
sadaptor.dll – Crypto Identity 5
ep1pk111.dll – ePass 1000
ep2pk11.dll – ePass 2000
ngp11v211.dll – ePass 2000 FT12
eps2003csp11.dll – ePass 2003
pkcs_marx.dll – CrypToken


For example, the command line could be (silent install):
msiexec.exe /qr /i c:\rohos_welcome.msi LOGON_CAPTION=”Welcome to the company” USB_KEY_LOGIN_ONLY=3 USB_REMOVAL=1
To uninstall:
msiexec.exe /qr /uninstall c:\rohos_welcome.msi

It is possible to use Orca database table editor application to modify the MSI file and create MST transform files:

When you launch MSI file in cmd shell command prompt, you need to run it as administrator. Example of MST file using command line:

msiexec.exe /i rohos_welcome.msi /qn TRANSFORMS=rohos.mst

cmd line install

Or install MSI with MST via group policies.

Customize login window

Elements that can be customized on the login screen

Welcome screen (login screen) can be customized with a custom text messages and USB key picture. You can do it in the following ways:

  • Using Rohos Center (Configure options link)
  • MSI options (during installations)
  • Modifying Rohos registry values.

Configure options dialog box.

Software and Hardware Requirements for Rohos Logon Key

In order to run Rohos Logon Key properly, PC with the following minimum requirements is needed:

  • Intel Pentium (or compatible) 166Mhz processor
  • 16 MB RAM
  • 1 or more MB free space on Hard Disk
  • At least 1 USB 2.0 or USB 1.1 USB port

The following devices support:

  • Regular USB flash drives compatible with Windows 2000/XP/2003;
  • U3 smart flash drives;
  • SD/MMC memory cards;
  • USB tokens: Aladdin eToken PRO, Futako HiToken, Aktiv ruToken, uaToken, SafeNet iKey , CryptoIdentity, ePass.
  • Fingerprint USB flash drives: Transcend, Apacer, LG.
  • BlueTooth enabled devices (Pocket PC, Mobile)

In our tests U3 smart drives work slower than regular USB flash drives because U3 smart drives handles additional virtual CD-ROM device.

Rohos Logon Key software supports the following operating systems:

  • Windows XP (Home and Professional) with or without SP1 or SP2;
  • Windows 2000 Professional with SP4 installed;
  • Windows 2000 Server (all versions) with SP4 installed;
  • Windows 2003 (all versions);
  • Windows Vista (all versions, x64);
  • Windows 7 (all versions, x64);

Note: Internet Explorer 5.5 or higher is needed in order to use Rohos Center control panel.

Using of different authentication models

Rohos Logon Key supports various Windows logon configurations. It allows using it both on the personal computer/laptop and on the corporate workstation joined to Windows/Novell network. The program integrates into any Windows logon configuration by using one of the Logon model listed below:

Picture 1

User can manually choose Logon model Logon model supported by Rohos:

  • Rohos welcome screen (gina.dll)
  • Windows XP/Vista welcome screen + Rohos
  • Windows native authentication (msgina.dll)
  • Rohos Credential Provider Windows Vista/7/8

The program automatically determines the best Logon model when you are installing it. This choice depends on the Windows version and login screen settings (for example fast user switching used, typical login dialog box used, custom Gina installed, etc.).

However, user can always choose specified Logon model manually by using: MSI installation package option or Rohos options dialog box.

Rohos welcome screen (gina.dll)

This method is based on the MsGINA.dll replacement. It totally replaces the Windows authentication and identification module (gina.dll) by a customized version of the authentication module (rohos_ui.dll).

Drawbacks:

  • It disables fast user switching in Windows XP.

Choose this method only if you want to:

  • See the users list in the welcome screen in Windows 2000;
  • Use your own background image in the welcome screen;
  • Use bigger (up to 90*90 pics) user icons on the login screen;
  • Use enhanced system security dialog box called by Ctrl+Alt+Del with network security function (shared resource/connections);

Rohos welcome screen 1

Windows XP/Vista welcome screen and Rohos

This method is recommended for Windows XP/Vista home computers. It does not disable fast user switching feature

Drawbacks:

  • Password expiration/renewal function with USB Key update is not supported;


Windows XP / Vista welcome screen + Rohos

Windows native authentication (msgina.dll)

This is the best Logon model for:

  • Windows 2000/2003 Server (if you plan to use remote desktop access by USB Key)
  • Windows 2000/XP workstations joined to Windows Active Directory (Windows Domain) or Novell network.

Rohos Logon Key does not replace the module GINA.dll. The security policies remain unaltered. As a result the computer run will be just as stable and secure as before Rohos has been installed. Rohos supports integration with msgina.dll, nwgina.dll, ctxgina.dll.

It is highly recommended to use this method in the following cases:

  • On a Terminal Server computer to access to Remote Desktop via USB flash drive;
  • If you use password expiration/renewal security policies;
  • On workstations joined to Active Directory/ Novell networks.

Windows native authentication + Rohos (in this case Novell Login)

Novell Client notice:


  • Rohos Logon Key enters user name and password into ‘User Name’ and ‘Password’ appropriate fields of Novell Login dialog box automatically;
  • Password renewal\change is not supported (for Rohos Logon Key version 2.0)

Rohos Credential Provider

It is a special component for Windows Vista, which implements a new user authentication method. Users see this component in the form of a user icon on the Windows logon screen. Rohos Credential Provider appears on the Windows logon screen in the form of an icon of a USB key.

Welcome screen in Windows Vista/Seven via Rohos Credential Provider

Connect a configured USB drive, and the component will read from it a list of logon profiles (user credentials) for authorization in the system. If necessary, it will also request a PIN code from the USB drive (two-factor authentication). These profiles are then passed to the local security system for authentication. Rohos Credential Provider will be automatically registered on the system following installation (on computers running Windows Vista).

Note: On installation, the program automatically selects an appropriate Logon Model.

Learn more about on our website: http://www.rohos.com/welcome-screen/rohos_credential_provider.htm

Main Features of Rohos Logon Key application

  • Rohos Logon Key set ups USB flash drive with your user name and password so that they will be automatically entered when you enter Windows.
  • Program supports the following Windows logon configurations:
    • Login into WindowsXP/Vista home computer;
    • Login into a workstation joined to Active Directory (Windows Domain), Novell Netware services;
    • Access to remote desktop on the Windows terminal server.
  • Computer can be locked or user session can be finished (log off) as soon USB flash drive has been disconnected from USB port;
  • Keyless mode allows disconnecting USB Key for some minutes without locking computer. For example if user needs to connect some device to USB port. As time passes the computer will be blocked (see USB_REMOVAL, Chapter 4.9);
  • USB flash drive can be used for computer security. It allows you to enter your user account only using USB Key;
  • In order to protect access to USB flash drive, you may use PIN code. PIN code can be entered by means of virtual keyboard which is protected from password tracking and from PIN code steal by output spy;
  • USB Key Management utility allows you to setup USB flash drives for hundreds of users quickly and easily;
  • Rohos application does not replace msgina.dll thus not creating any problems with compatibility;
  • Rohos supports password renewal policy; the password is renewed on the USB Key;
  • Safe Mode. The access with the USB key works also by the loading Windows in Safe Mode.

USB Key security features:

  • USB Key cannot be duplicated. Key logon profile is bound up with a USB flash drive serial number.
  • USB Key originality. By default USB Key is bound up with a computer where it was created for login. The other USB Key will be ignored by the program (even with a valid logon profile). Computer owner can forbid using any other USB Key except the 1st one for login.
  • Protected password. By default USB Key does not contain your Windows password in plain form, but only Encryption Key pair that is used to reconstruct password for login operation.
  • Two-factor authentication by using PIN code for USB Key. This is a small password with only 3 attempts to enter, it is required when performing login by using USB Key;
  • USB Key that was created by USB Key Manager Tool cannot be modified on home computer (for example, Logon profiles cannot be cleared or modified using Rohos Logon Key program)
  • Rohos Logon Key can disable user access to USB flash drives and removable media connected to computer through USB port;

Using of Rohos Logon Key in Active Directory

  1. Before you start
  2. Creating 2FA database with Rohos Management Tools
  3. Using Rohos Key Manager to configure authentication keys
  4. Enterprise-wide Google Auth, OTP configuration
  5. Installing Rohos Logon Key
  6. Licensing

Rohos Logon Key application supports standalone workstations as well as domain joined  in Active Directory (AD). In this article we’ll describe the second case, where the Rohos Logon Key in installed over a AD domain to perform strong dual factor authentication for local console logon or remote desktop logon on Terminal Services environments with multiple TS hosts.


Before you start

1. Decide on the type of Authentication method you are going to use : hardware security device, OneTimePassword generator or UID RFID card. Ensure that it could be used in Active Directory environment with centralized Key management and also with Remote Desktop connection if applicable.

2. Understand the types of 2-factor authentication (2FA) control policy you can implement with Rohos:

  • By AD user group membership : All users included into a specially created Active Directory group will be required to perform two-factor authentication in order to login/unlock workstation; This is the recommended option;
  • For the listed users – the list of users  who will be required to use dual factor authentication, it is stored in AD 2FA Partition.
  • For Remote Desktop users: only remote desktop sessions will be subject to dual factor authentication. The additional IP filtering is also possible to use.

Creating 2FA user group in Active Directory

For example, we can create a domain with DNS-name AMP.local and NetBIOS-name AMP. Let’s assume, a user with name Admin1 must
log in only by 2FA authentication method, the authentication only by the password is forbidden for him. We have to create a new group with a special name, 2FA_users for example and add user Admin1 there. So, this user will be a member of two groups at the same time: Domain users and 2FA_users.

Note: You can choose another name for the group with 2-factor authentication.


Creating 2FA database in Active Directory

Rohos takes advantage of the data storage technology offered by MS Active Directory by creating an AD application partition (database) to store all its 2FA configuration data, user list, devices list and other domain-wide settings of Rohos. Adding additional 2FA schema elements will have no performance impact on other AD/LDAP objects. Learn more…

  1. Install Rohos Management Tools on your primary AD domain controller with schema master role (FSMO);
    • Rohos Remote Config will prompt to create 2FA database in Active Directory, click YES.
    • To check if current DC has FSMO, use “netdom query fsmo” command line.
    • Later you also need to install Rohos Management Tools on secondary DCs to replicate 2FA settings on it in order to add redundancy for it according to Active Directory principles. Rohos Remote Config will automatically prompt to create 2FA database replicate on the secondary DC.
  2. Launch Rohos Remote configuration utility and confirm to create an AD database for Rohos Logon Key 2FA options;
  3. Setup 2FA options:
    2FA Authentication device/method,
    2FA control type,
    2FA group name to hold the list of 2FA users.
    Local accounts 2FA control, etc.
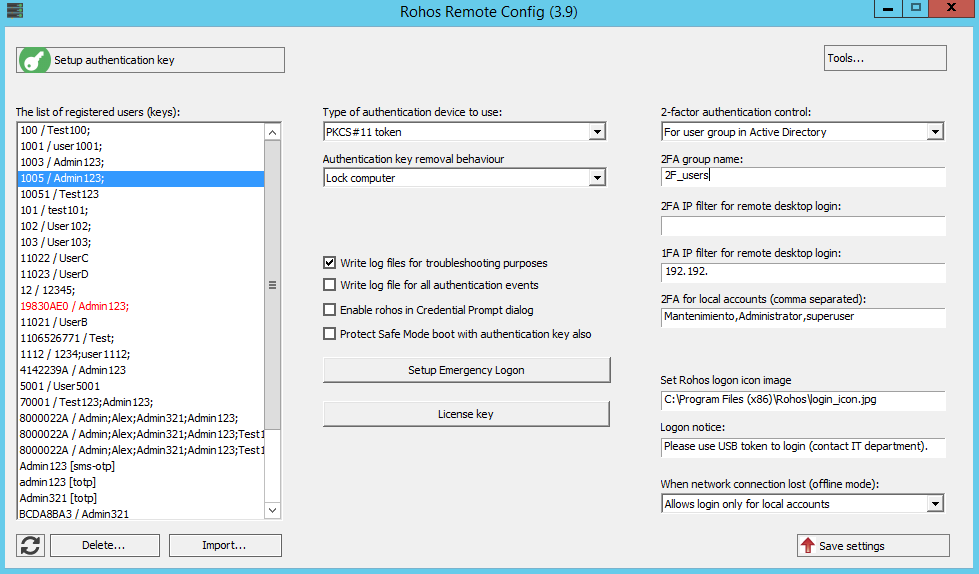
  4. Rohos Remote Config also display the list of 2FA devices associated with user accounts, so you can choose particular 2FA means,
    and save this setting;
    Later, You can install Rohos Management Tools on a local workstation
    with AD administration credentials to continue configuring Rohos and
    locally attached authentication devices;
  5. Click Setup Authentication Key to start configuring authentication keys or methods for any user.

After all the authentication keys were created for a target user group click Refresh all in
Rohos Remote config utility and you will see all the keys, created in
the 2FA database.

Read more about the Rohos Management Tools>>>


Using of Key Manager to configure authentication keys

Click “Setup Authentication Key” to launch Rohos Key Manager utility or OTP configuration dialog (depending on a primary 2FA method).

You need to decide on two-factor authentication vs password replacement solution. With Rohos two-factor authentication types are:

  1. Authentication device or OTP method + Windows password;
  2. Authentication device + PIN code;
  3. Just authentication device – works as a password replacement;

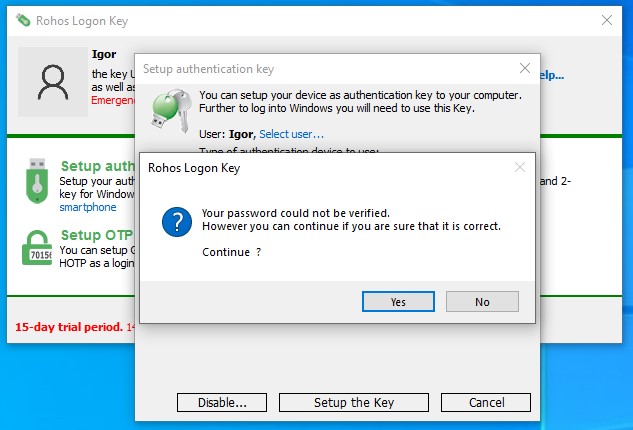
Connect the authentication device. In main window of USB Key manager we can see the list of profiles, stored or associated with the key. Click Add logon profile button.

To edit the profile, select it and press the Edit button. If this key was created before in Rohos Logon Key
application, the password will be encrypted. This profile is not
suitable for the authentication of domain computers. Click in * button
at the right, to show the password. You must change it to non-encrypted
in both fields and click OK.

  • If you are not using the AD domain, you can leave the Domain field blank. Then the key will be allowed to log in to all the PC, where this combination of login and password is present.
  • If you want two-factor authentication Key + Windows Password then leave password field blank. Then the user will need to use Key + password to login.

You may leave the password field empty, so, a user will be forced to input it
manually during the authentication, along with his Authentication key. The key can
help to identify the user, even if he changes his password.

Centralized enterprise-wide Google Auth OTP configuration.

If you selected Google Authenticator OTP as the primary authentication method.

Click “Setup Authentication Key” will open OTP configuration dialog:

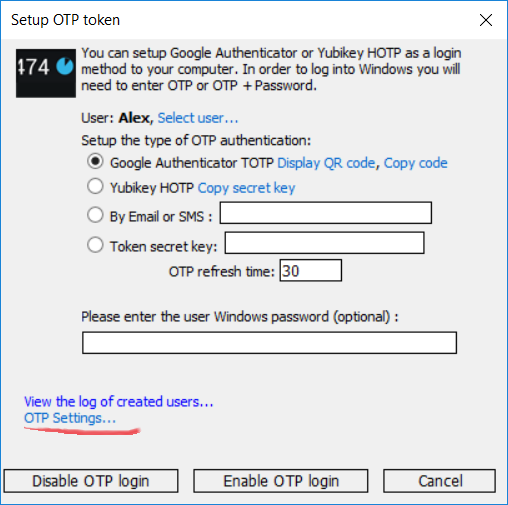
You need to choose user account, OTP method and click Enable OTP login.

Also, it is possible for automated, scriptable configuration of multiple user accounts with Google Authenticator and deliver OTP configuration by email. Read more…

Installing Rohos Logon Key application

Next, in order to apply 2FA control it is required to install Rohos Logon Key
application on each workstation and Terminal Server where you need two-factor authentication. After the installation, Rohos Logon Key application will automatically find the Active Directory 2FA settings, if this computer
is connected to a domain.

Download Rohos Logon Key

Please note that you also need to install Rohos Management Tools on secondary DC to replicate 2FA database on it in order to add redundancy functionality for it according to Windows AD principles. Rohos Remote Config will automatically prompt to create 2FA database replicate on the secondary DC.

Rohos Licenses for domain computers

  • Pro license – for each domain workstation.
  • Server license – for terminal servers, RDC on Windows 2003, 2008, 2012.